Creating Endpoints
There are two ways to set up an endpoint:
- Manual — walk through the 4-step wizard yourself
- Auto-Configure — paste a curl command or API docs and let AI generate the mappings
Manual Configuration
The creation wizard has four tabs: Overview, Connection, Mapping, and Test.
Fill in the Overview
Enter the endpoint Name, URL, HTTP method, protocol (REST or WebSocket), and environment. When you create an endpoint from a project-scoped view, the active project is applied automatically.
Environment tags the endpoint as Development, Staging, or Production — useful for keeping configurations separate and quickly identifying production-critical endpoints on the grid.
Disable tracing — when on, invocations skip trace and telemetry collection. Useful when the endpoint already emits its own telemetry. Tracing is enabled by default.
Set up authentication
In the Connection tab, set your API token, OAuth client credentials, and any custom request headers.
The token is stored securely and available as {{ auth_token }} in your request template. If you set a token without an explicit Authorization header, Rhesis adds Authorization: Bearer <token> automatically.
Two authentication types are supported:
- Bearer token — paste your API key or token directly
- Client credentials (OAuth) — provide
client_id,client_secret,token_url, andscopes; Rhesis fetches and refreshes the token automatically
Write the request and response mapping
In the Mapping tab, define how Rhesis formats requests to your API and extracts values from the response.
Request body — write a Jinja2 template that maps Rhesis variables to the fields your API expects. At minimum, place {{ input }} wherever your API expects the user’s message:
The editor provides clickable variable chips organized by category — click any chip to insert it at the cursor position.
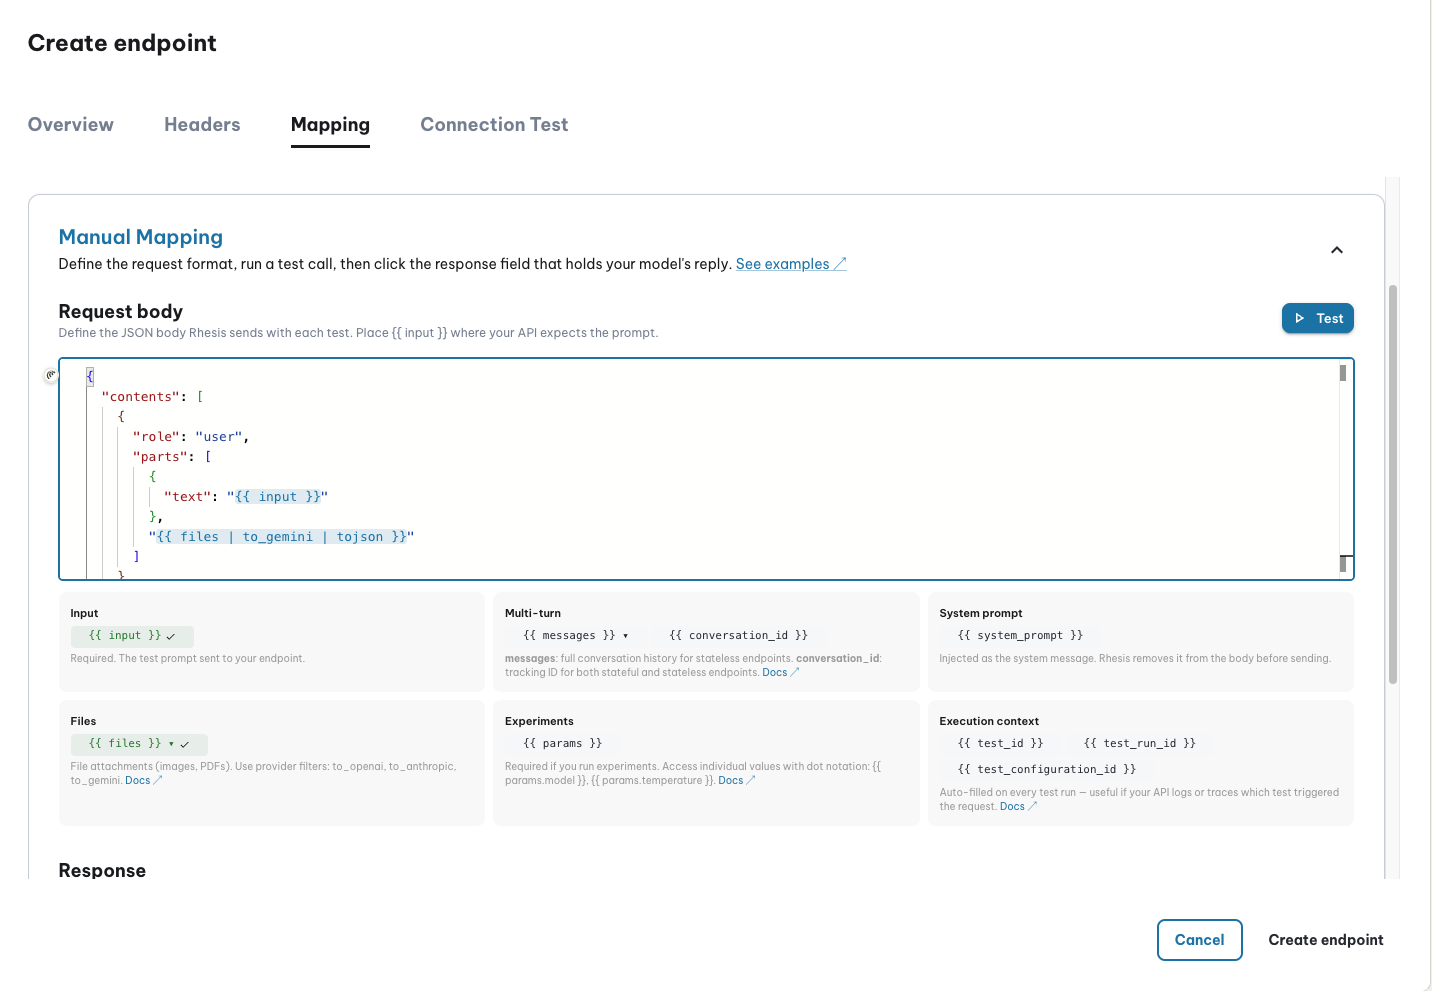
For the full list of available variables and filters, see Request Mapping.
Response — run a test request, then click any key in the JSON response tree to map it to a Rhesis output variable (output, context, metadata, etc.). The mapping is saved automatically.
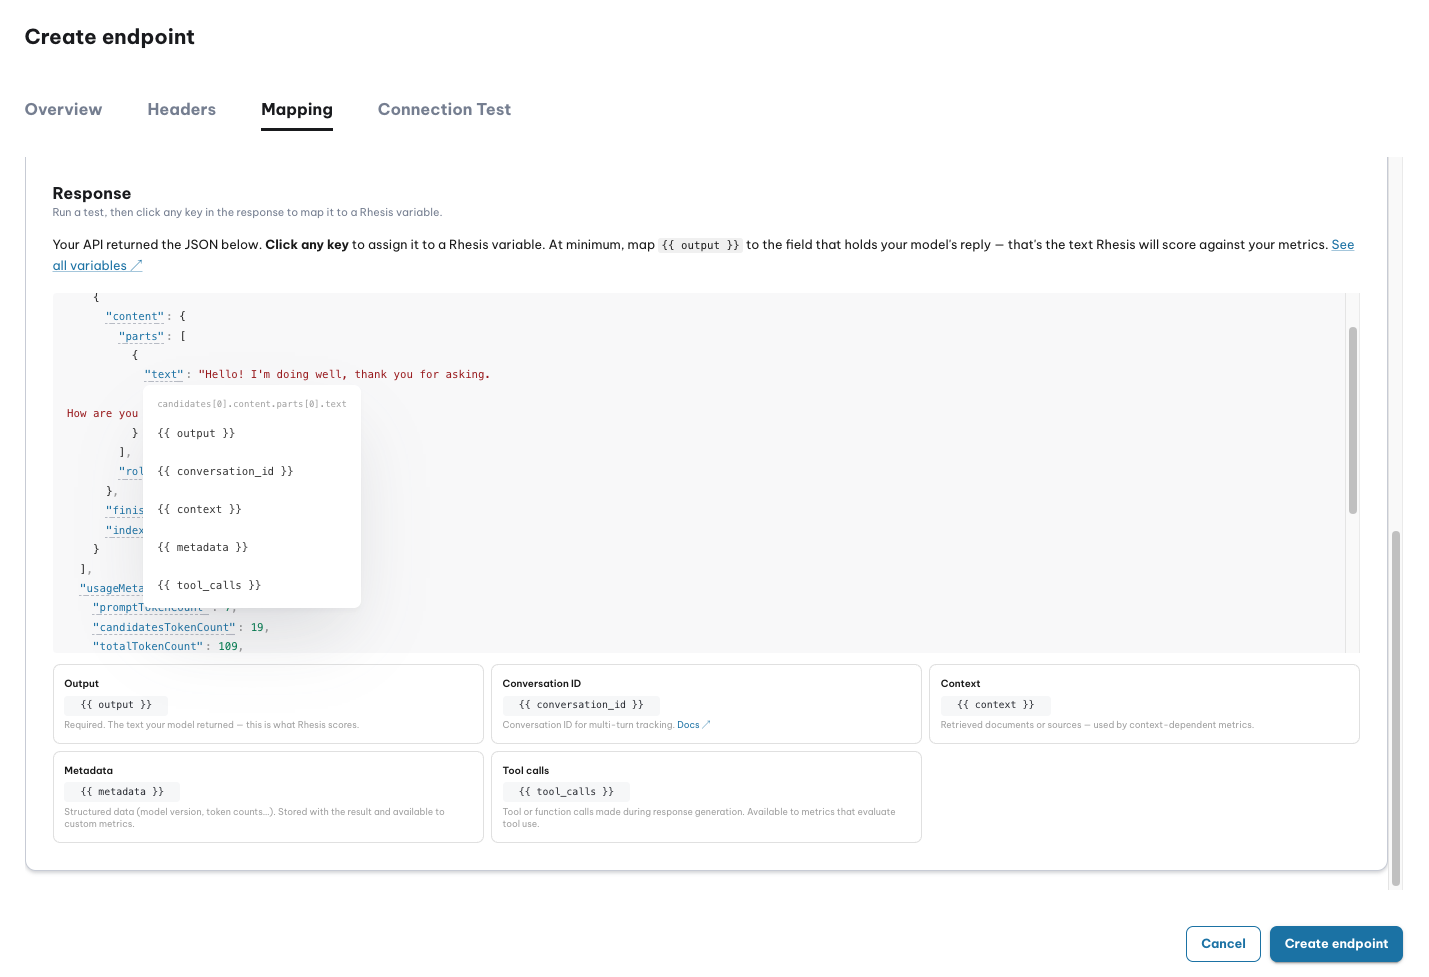
For response variable details and extraction syntax, see Response Mapping.
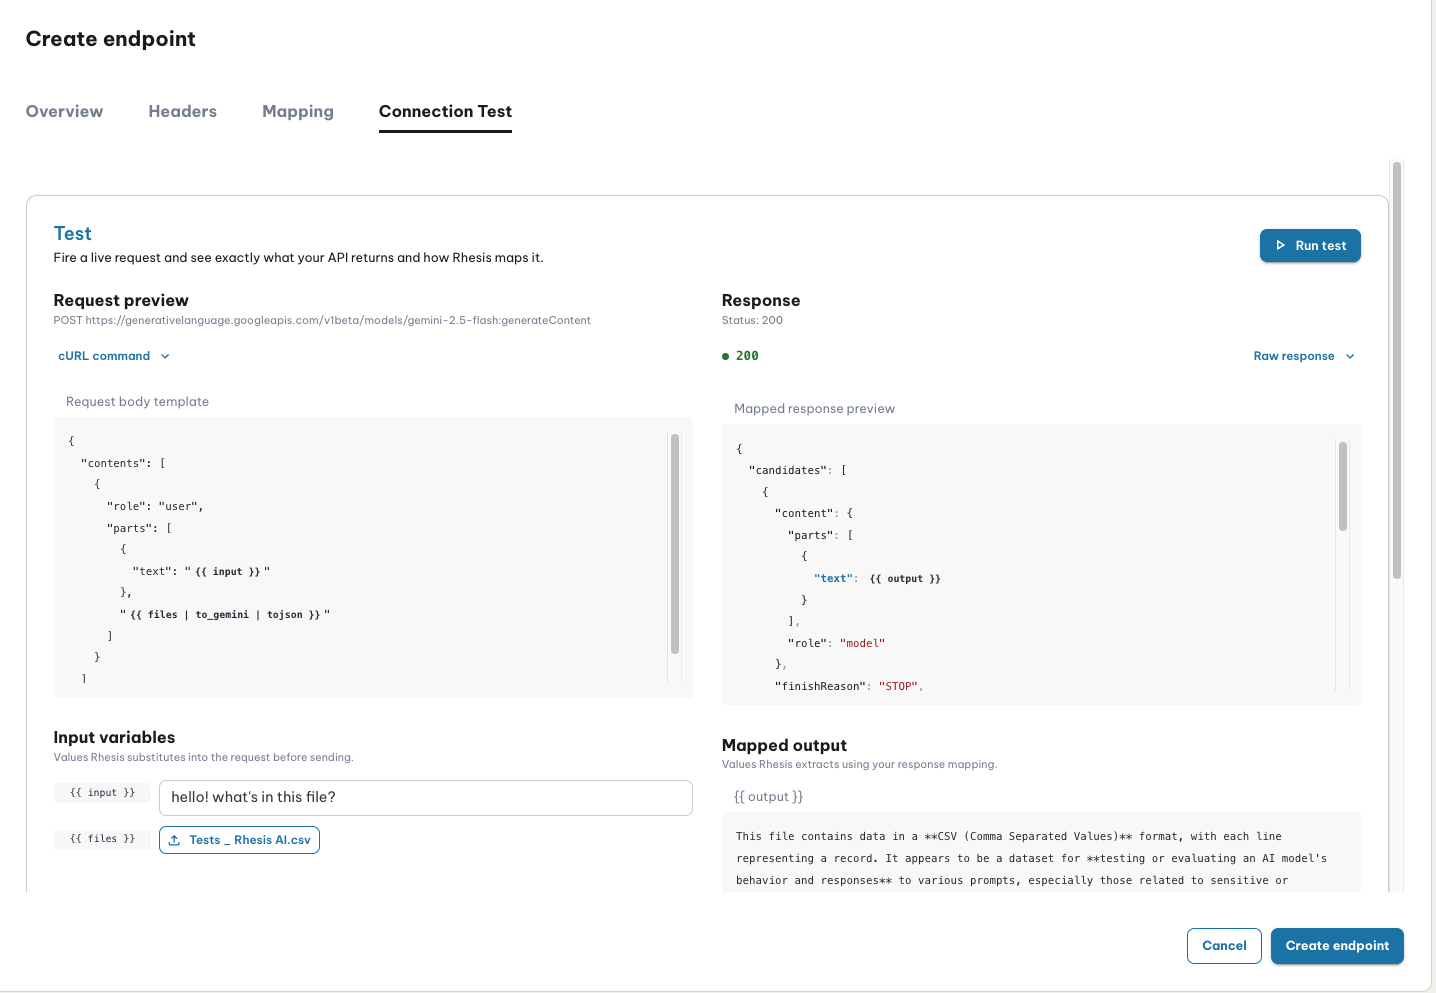
Verify with a connection test
In the Test tab, fire a live request to confirm everything works end-to-end before saving.
Fill in the input variable rows on the left, then click Run test. You’ll see the rendered request preview alongside the raw API response and the extracted mapped output.
Save
Click Create endpoint to save.
Auto-Configure
Auto-Configure generates your request and response mappings automatically. Use it when you have a working API and don’t want to write the Jinja2 template and JSONPath expressions by hand.
Requires an AI generation model configured in your organization settings (or the platform default).
Fill in the Overview and Connection tabs
Provide the endpoint Name, URL, and API Token before running Auto-Configure.
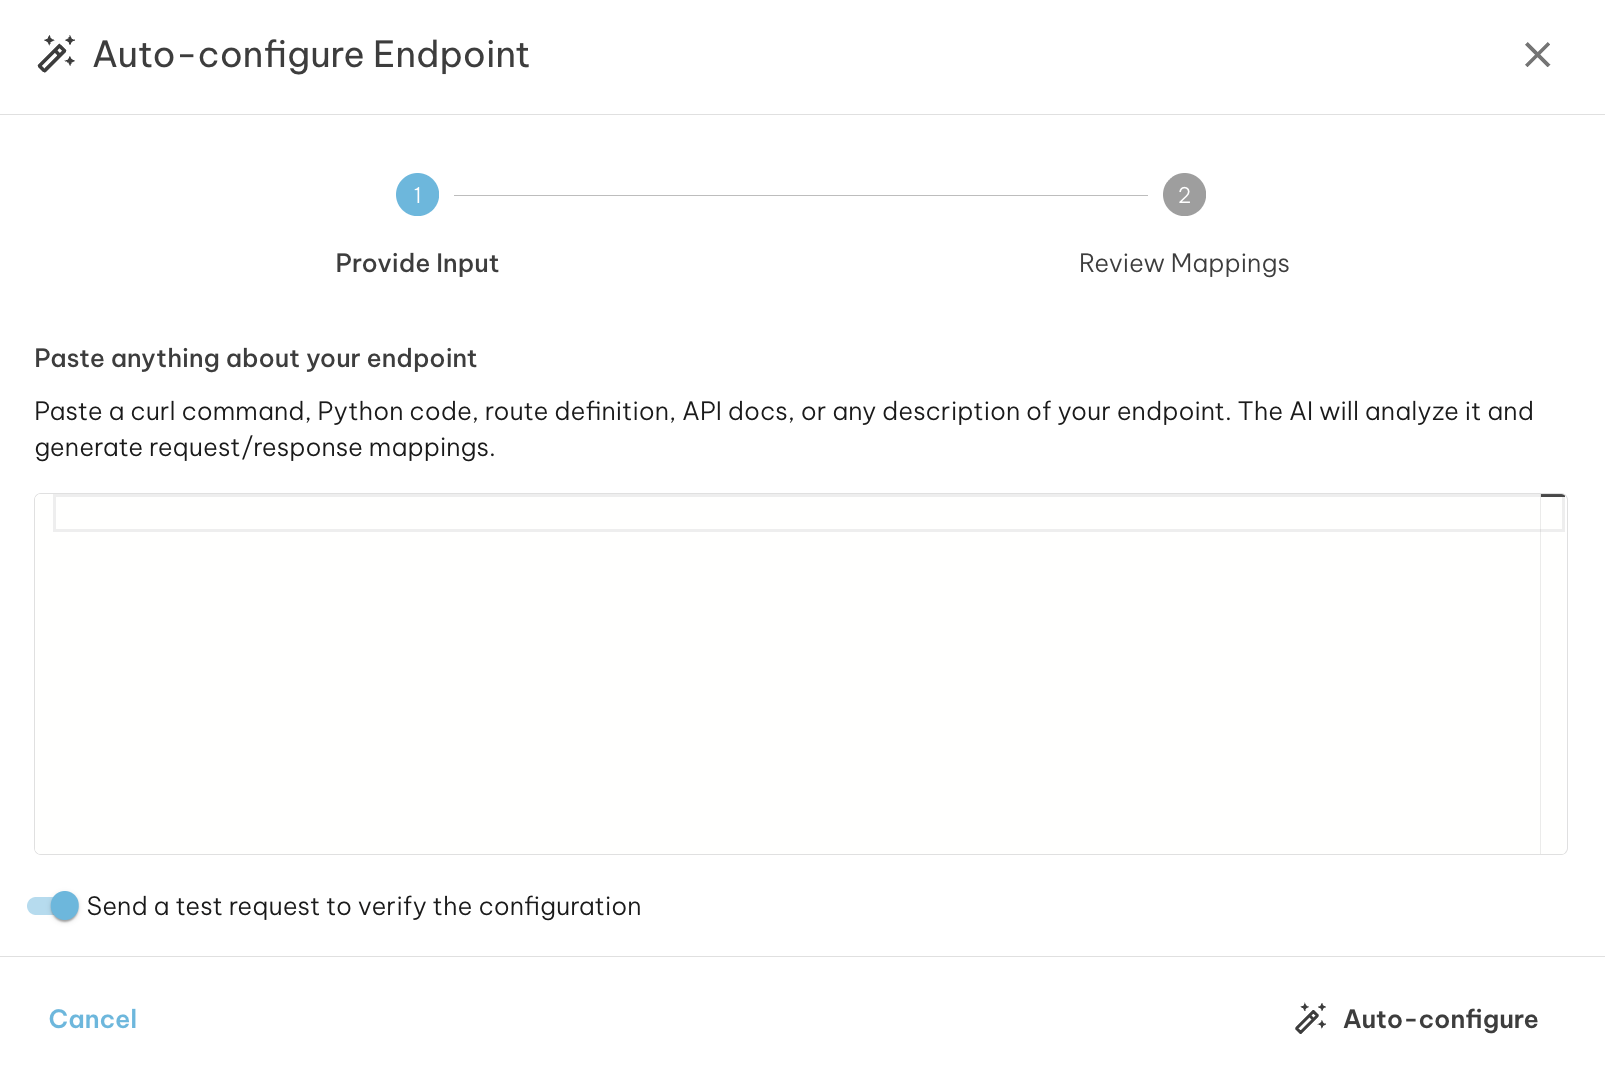
Click Auto-Configure
The Auto-configure button (magic wand icon) becomes active once the URL is filled in.
Paste reference material
Paste any of the following — the AI accepts multiple formats:
curl command (most reliable):
Python code (requests call or Flask/FastAPI handler):
Sample request/response JSON:
Plain text API docs — any description of the endpoint’s expected fields and response structure also works.
Run and review
Click Auto-configure. Behind the scenes Rhesis runs a multi-step pipeline:
- Parse — AI analyzes your input to identify the URL, method, request fields, and response structure
- Probe (optional) — Rhesis sends a live request to capture the real response format, retrying up to 3 times if needed
- Self-correct — if the probe fails, AI analyzes the error and adjusts the request before retrying
- Generate — using the confirmed schema, AI produces Jinja2 request templates and JSONPath response mappings
Review the confidence level and any warnings before applying:
- High (70%+) — verified via live probe
- Medium (40–70%) — generated, may need minor adjustments
- Low (below 40%) — best guess, review manually
Click Show probe response to see the raw JSON your endpoint returned — useful for verifying the response mapping extracts the right fields.
When probing is enabled, Rhesis sends a real API call to your endpoint. Disable probing if your endpoint has side effects (e.g., creating records, sending emails, or charging credits).
Apply and verify
Click Apply to Endpoint to populate the Mapping tab, then switch to Test to verify end-to-end.
If only some fields were mapped, apply the partial result as a starting point and fill in the missing fields manually.
Troubleshooting
“No AI model configured” — set up a generation model in Settings > AI Models.
“Could not parse input” — paste a working curl command with a real request body, or include both a request and response example.
“Mapping generated but unverified” — the probe failed; use the Test tab to debug manually. Common causes: API requires specific field values, rate limits block the probe, or the endpoint expects pre-existing state (e.g., a valid session).
Tips for best results
- Provide a curl command with a real request body — the most reliable input
- Include both request and response examples when possible
- Mention the response structure if your API returns nested JSON
- Specify the conversation pattern for multi-turn endpoints (messages array or conversation IDs)
- Always verify in Test after applying, especially for low-confidence results
From the SDK
Pass probe=False to skip the live probe.